前言

这个是2016年7月份没事的时候瞎搞的,最近发现这种方法失效了,所以就放出来。

准备

需要修改的包net.xmind.verify_3.6.1.201512221925
org.xmind.meggy_3.6.1.201512221925
准备工具jd-gui eclipse IntelliIdea

步骤

  • 1.是用jd-gui反编译以上两个包,点击file->save all sources保存源码

  • 2.新建两个eclipse plun-in project 把源码复制到src目录下面,其余文件复制到根工程目录下面(试过 improt plus-ins and fragments的工程 貌似失败了 忘记为啥)

  • 3.
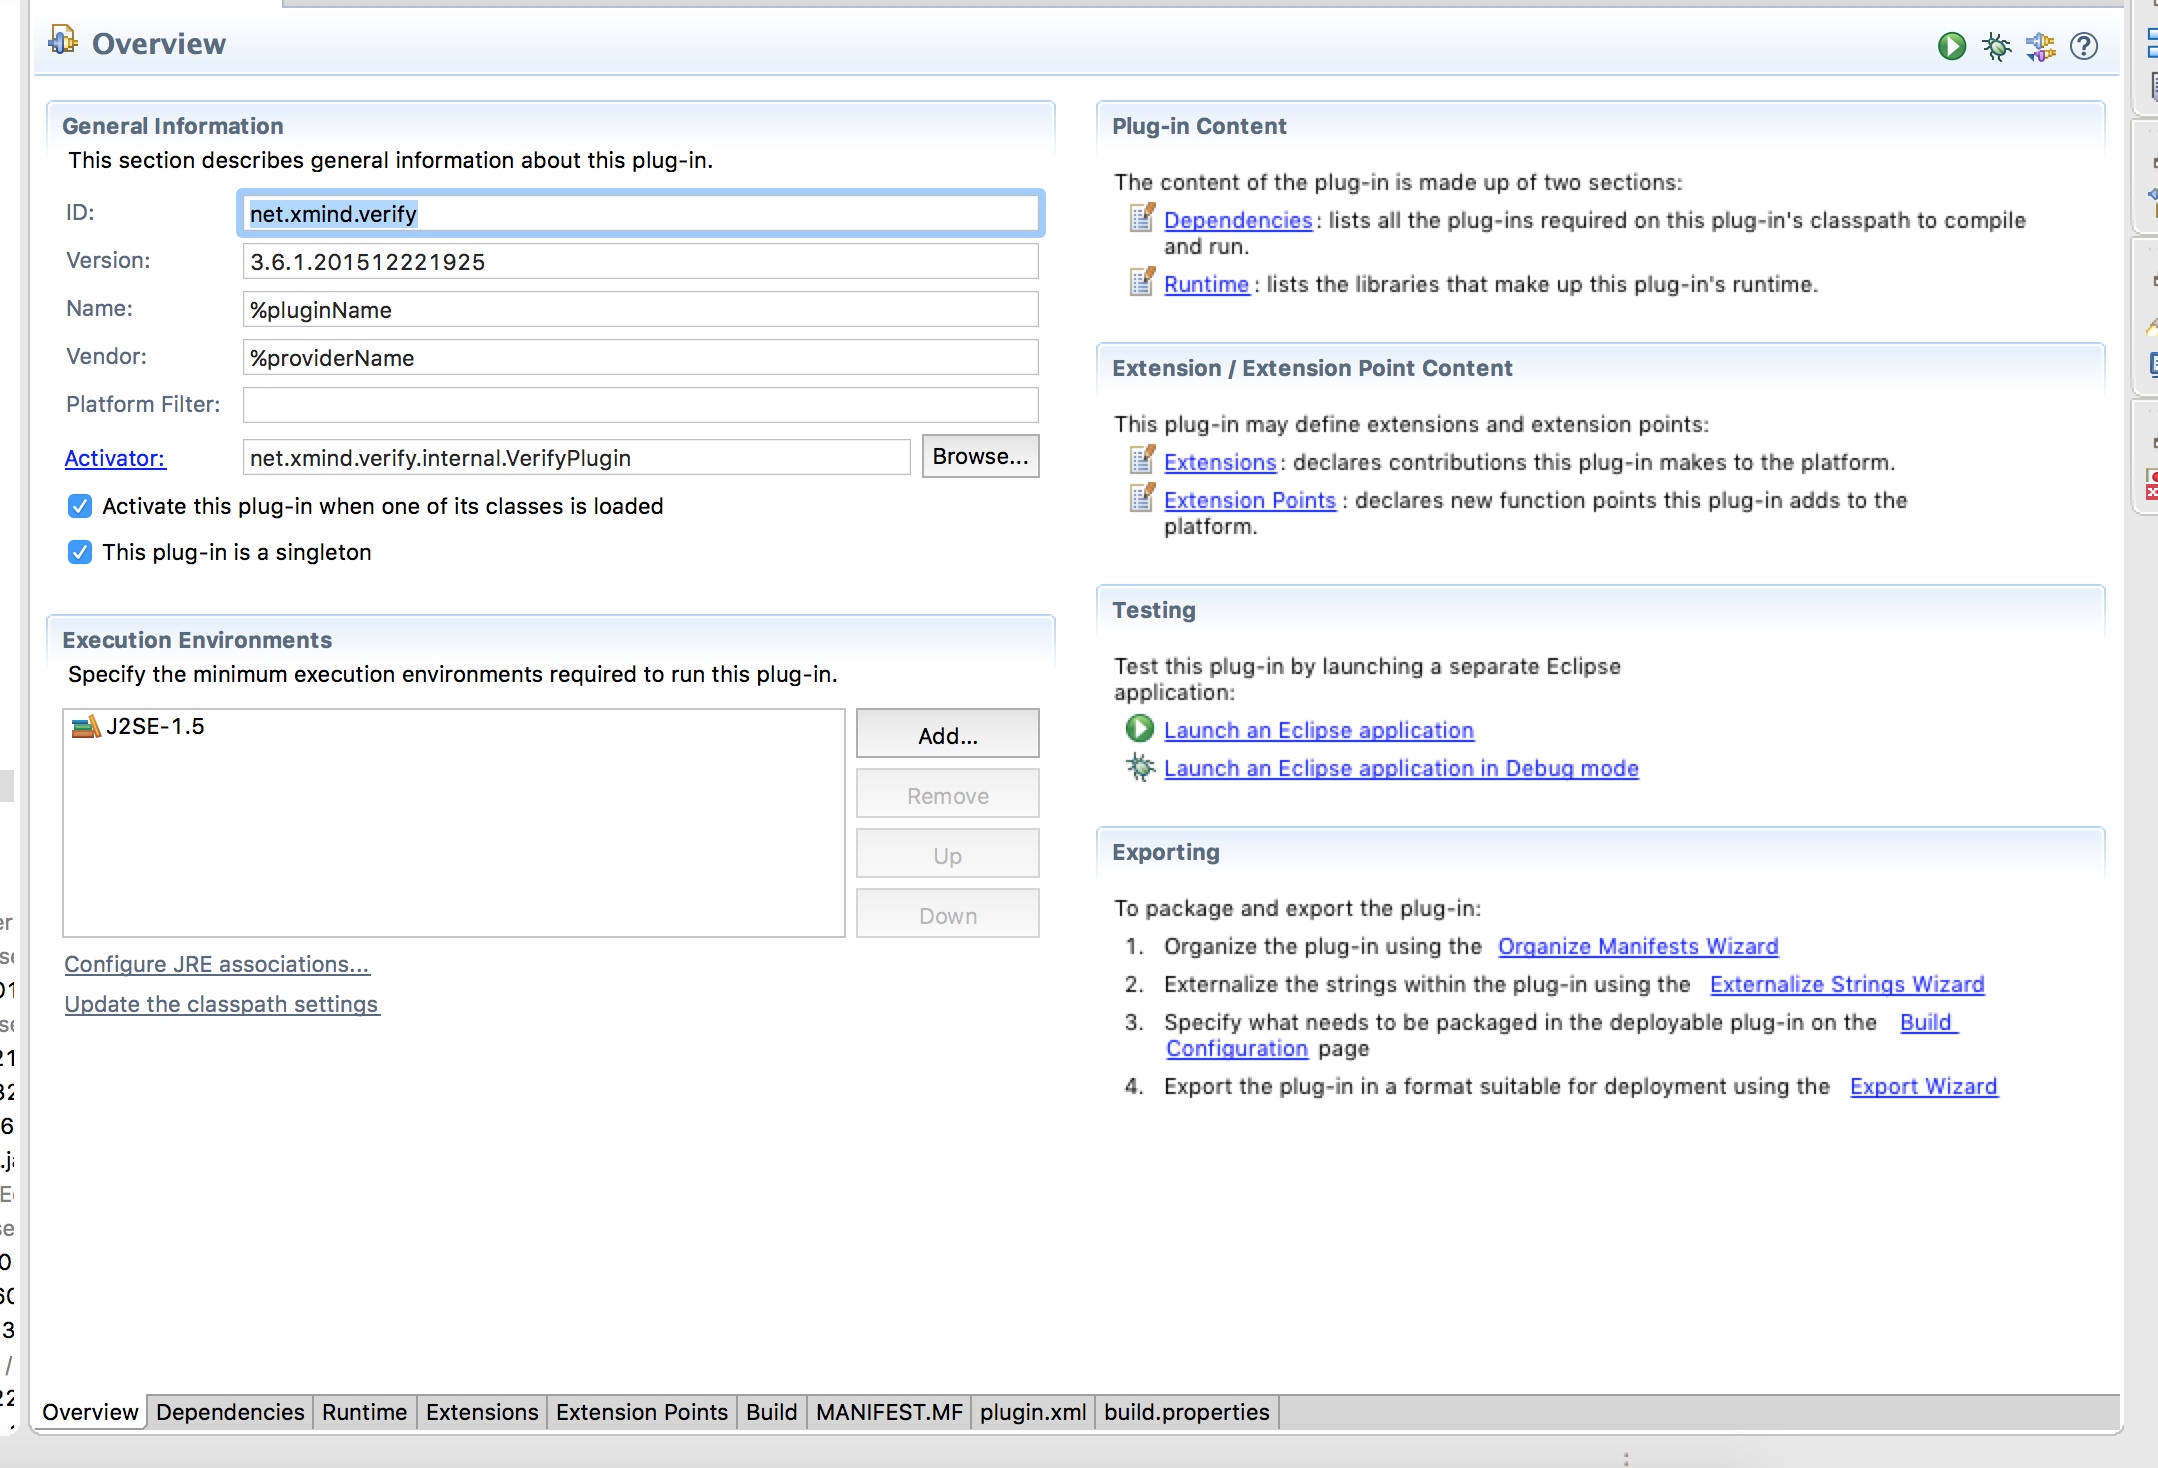
    因为eclipse 在这个界面提供了很多可视化操作 所以我就放弃了用ant写build.xml打包了

  • 4.打包!因为这两个jar包依赖了其他jar包,所以添加classpath的时候,把xmind安装目录下面的plugin文件夹里面的jar全添加进去了,打包只要点上图右下角exprot wizard这个就可以打包了

  • 5.打包的时候 net.xmind.verify的MAINFEST.MF 文件夹会有报错 ,把报错的移除掉就可以,jd的反编译会有好多错误 我是结合了idea的反编译一起改的

工程结构

本质就是一个eclipse gui的插件工程
src文件夹:存放源码
META-INF:顾名思义 存放类元信息的地方重点在MAINFEST.MF

MAINFEST.MF 片段
>Manifest-Version: 1.0
Export-Package: net.xmind.verify,net.xmind.verify.ui
(Enumerate all the packages that this plug-in exposes to clients. All other packages will be hidden from clients at all times.
就是说这个Export Package的包允许被其他插件访问 其他的隐藏)

Bundle-ActivationPolicy: lazy
Built-By: so
Bundle-Name: %pluginName
Bundle-Localization: plugin
Created-By: Apache Maven 3.3.3
Bundle-RequiredExecutionEnvironment: J2SE-1.5
Require-Bundle: org.eclipse.ui,org.eclipse.core.runtime,org.apache.com
mons.codec,org.json,net.xmind.signin;bundle-version=”[3.6.0,3.7.0)”,o
rg.xmind.ui.toolkit;bundle-version=”[3.6.0,3.7.0)”,org.xmind.core.com
mand;bundle-version=”[3.6.0,3.7.0)”
(Require-Bundle 需要依赖的插件)
Bundle-Vendor: %providerName
Build-Jdk: 1.7.0_75
Bundle-Version: 3.6.1.201512221925
Bundle-ManifestVersion: 2
Bundle-Activator: net.xmind.verify.internal.VerifyPlugin
(插件的的激活类 大概是这个意思)
Bundle-SymbolicName: net.xmind.verify;singleton:=true
Archiver-Version: Plexus Archiver
Name: net/xmind/verify/internal/LicenseVerifier$VerificationJob$7.clas
s
SHA-256-Digest: UzAsYnNacAIW3/SDkvW6pk80hEDCLxYnNJPcwoxFmLY=
(每个class文件有一个对应的sha值 )

SIGNINF.DSA:与签名文件相关联的签名程序块文件,它存储了用于签名 JAR 文件的公共签名。

SIGNINF.SF: JAR 文件的签名文件。

SIGNINF.SF 片段:

Signature-Version: 1.0
SHA-256-Digest-Manifest-Main-Attributes: JGnBO5rPBiTyeCRQyOLcPoCKlWxWq
61cD9xYGCuOWnE=
SHA-256-Digest-Manifest: YBfAA1n5gYq3kchjzemOJnO5IyhAvKCmQl1sdig2XEY=
Created-By: 1.7.0_75 (Oracle Corporation)
Name: net/xmind/verify/ui/internal/StartupVerifier.class
SHA-256-Digest: Vk+LkwOWVeqQlvILKjYty4+YZGjBmwPF0QomtNDIHY0=

其余文件与破解无关 略过

打包与避过校验

阶段一:一开始随意修改net.xmind.verify
开始界面提示

在关于xmind->安装细节->配置信息->错误日志里面发现了以下log

!MESSAGE 下列 jar 中的清单文件或特征符文件已被篡改:/at org.xmind.ui.internal.meggy.PluginGuardian.isPluginSignatureVerified(PluginGuardian.java:205)

以上是org.xmind.meggy这个包的代码 于是顺藤摸瓜找到

1
2
3
4
5
6
7
8
9
10
11
12
13
14
15
16
17
18
19
20
21
22
23
24
25
private boolean isPluginSignatureVerified(X509Certificate targetCertificate, String pluginId) {
Bundle bundle = Platform.getBundle(pluginId);
if(bundle == null) {
MeggyPlugin.getDefault().getLog().log(new Status(4, "org.xmind.meggy", "Bundle not found: \'" + pluginId + "\'."));
return false;
} else {
Map certs = bundle.getSignerCertificates(1);
if(certs.isEmpty()) {
MeggyPlugin.getDefault().getLog().log(new Status(4, "org.xmind.meggy", "Bundle not signed: \'" + pluginId + "\'."));
return false;
} else {
Iterator var6 = certs.keySet().iterator();
while(var6.hasNext()) {
X509Certificate cert = (X509Certificate)var6.next();
if(cert.equals(targetCertificate)) {
return true;
}
}
MeggyPlugin.getDefault().getLog().log(new Status(4, "org.xmind.meggy", "Bundle not signed correctly: \'" + pluginId + "\'."));
return false;
}
}
}

故方法名思义,是校验文件签名的方法,所以直接返回改为true 跳过校验

1
2
3
private boolean isPluginSignatureVerified(X509Certificate targetCertificate, String pluginId) {
return true;
}

但是又出现了一个新的问题

!MESSAGE 下列 jar 中的清单文件或特征符文件已被篡改:/Applications/XMind.app/Contents/Eclipse/plugins/net.xmind.verify_3.6.1.201512221925.jar
!STACK 0
java.security.SignatureException: 下列 jar 中的清单文件或特征符文件已被篡改:/Applications/XMind.app/Contents/Eclipse/plugins/net.xmind.verify_3.6.1.201512221925.jar
at org.eclipse.osgi.internal.signedcontent.SignatureBlockProcessor.verifyManifestAndSignatureFile(SignatureBlockProcessor.java:158)

一下是堆栈的相关代码

1
2
3
4
5
6
7
8
9
10
11
12
13
14
15
16
17
18
19
20
21
22
23
24
25
26
27
28
29
30
31
32
33
34
35
36
37
38
39
40
/**
* Verify the digest listed in each entry in the .SF file with corresponding section in the manifest
* @throws SignatureException
*/
private void verifyManifestAndSignatureFile(byte[] manifestBytes, byte[] sfBytes) throws SignatureException {
String sf = new String(sfBytes, SignedContentConstants.UTF8);
sf = stripContinuations(sf);
// check if there -Digest-Manfiest: header in the file
int off = sf.indexOf(digestManifestSearch);
if (off != -1) {
int start = sf.lastIndexOf('\n', off);
String manifestDigest = null;
if (start != -1) {
// Signature-Version has to start the file, so there
// should always be a newline at the start of
// Digest-Manifest
String digestName = sf.substring(start + 1, off);
if (digestName.equalsIgnoreCase(MD5_STR))
manifestDigest = calculateDigest(getMessageDigest(MD5_STR), manifestBytes);
else if (digestName.equalsIgnoreCase(SHA1_STR))
manifestDigest = calculateDigest(getMessageDigest(SHA1_STR), manifestBytes);
else
manifestDigest = calculateDigest(getMessageDigest(digestName), manifestBytes);
off += digestManifestSearchLen;
// find out the index of first '\n' after the -Digest-Manifest:
int nIndex = sf.indexOf('\n', off);
String digestValue = sf.substring(off, nIndex - 1);
// check if the the computed digest value of manifest file equals to the digest value in the .sf file
if (!digestValue.equals(manifestDigest)) {
SignatureException se = new SignatureException(NLS.bind(SignedContentMessages.Security_File_Is_Tampered, new String[] {signedBundle.getBaseFile().toString()}));
signedBundleHook.log(se.getMessage(), FrameworkLogEntry.ERROR, se);
throw se;
}
}
}
}

上面大概意思就是根据MAINFEST.MF和SIGNIN.SF去校验jar包的合法性
一开始是往错误的方向走,想要改这个包的代码,但是因为反编译出来非常多错误所以花费了不少时间在这上面,使用了idea的反编译也是不少错误,做了不少无用功,后来想着是eclipse的包名 或许有开源出来 就去maven找了下 真的找到了,而且附带了注释。本着理通整个流程的想法,顺着报错的堆栈找到了process方法

1
2
3
4
5
6
7
8
9
10
11
12
13
14
// read all the signature block file names into a list
Enumeration<String> en = wrappedBundleFile.getEntryPaths(META_INF);
List<String> signers = new ArrayList<String>(2);
while (en.hasMoreElements()) {
String name = en.nextElement();
if ((name.endsWith(DOT_DSA) || name.endsWith(DOT_RSA)) && name.indexOf('/') == name.lastIndexOf('/'))
signers.add(name);
}
// this means the jar is not signed
if (signers.size() == 0)
return createUnsignedContent();
byte manifestBytes[] = readIntoArray(be);

就是说当找不到RSA和DSA结尾这两个文件的时候就跳过签名验证,于是乎,我在打包的时候把sf和dsa两个文件排除在外。然后还是各种class not found,其实此时已经打包好了,也可以正常使用了,但是估计是之前的错误报错被缓存下来了,所以一直跑不通,解决方法就是删除软件和用户目录下面与xmind有关的信息,在重新安装。至此打包替换的已经避过校验了 想怎么改就怎么改

破解思路

一开始言小午是说修改isvlidate()这个函数的值为true就行了,修改后,发现点击升级pro后没有反应,pro功能也不能用,所以就转变思路的

错误思路一:发现每个包都有个messages.properties,这东西是用来做国际化的 warningDialog_title_invalidUser=XMind这种形式,有对应的语言包 根据不同语言加载不同的文件。
我把语言改成英文 然后找找到了填写序列号的那个验证按钮在messages.properties中对应的key, 想从验证按钮的点击事件监听开始 看下处理流程,但是我小看了这货的复杂程度,最后费了好大的功夫都搞不定,看了好多eclipse gui的api,最后感觉这样耗下去都可以开发eclipse gui了

错误思路二:一开始以为验证序列号是https请求验证,有这种想法是因为在启动的时候都会做一次signin的请求(写了个文件输出类,输出追一些启动过程的数据),让我以为这个原来是要做登陆操作才能校验成功。所以从https请求查起,一直顺着那个https请求找下去发现并不是,验证序列号其实是在本地的。
signin失败了也没关系,实际也是,做软件的,不允许软件脱机使用也是不合理的。
关于追踪https请求的过程,其实还没有找到判断https响应的代码,其实找到了顺着这个思路估计也是可行的,但是因为https请求的包分散在几个jar包了,所以没有去追踪

正确思路:搜关键词mail 搜到了一个方法LicenseVerifier.doVerifyLicenseKey()
发现licenseKey是长度为225个字符组成,前12个字符是licenseheader

1
2
3
4
5
6
7
8
9
10
11
12
13
14
15
16
17
18
19
20
21
22
23
24
25
26
27
28
29
30
31
32
33
34
35
36
public static LicenseKeyHeader decode(String header) throws IllegalArgumentException
/* */ {
/* 116 */ if (header.length() != 12) {
/* 117 */ throw new IllegalArgumentException(
/* 118 */ "Invalid length of license key header: " + header.length());
/* */ }
/* */
/* 121 */ String marker = header.substring(0, 1);
/* 122 */ if (!"X".equals(marker)) {
/* 123 */ throw new IllegalArgumentException("Invalid license key header: " +
/* 124 */ header);
/* */ }
/* */
/* 127 */ String type = header.substring(1, 2);
/* */
/* 129 */ String vendorName = header.substring(2, 4);
//36进制
/* 130 */ int majorVersion = Integer.parseInt(header.substring(4, 5), 36);
/* 131 */ int minorVersion = Integer.parseInt(header.substring(5, 6), 36);
/* */
/* 133 */ String licenseeType = header.substring(6, 7);
/* 134 */ int yearsOfUpgrade = Integer.parseInt(header.substring(7, 9), 36);
/* */
/* 136 */ int freeMonths = decodeFreeMonthsFromHeader(header);
/* */
/* 138 */ return new LicenseKeyHeader(header, type, vendorName, majorVersion,
/* 139 */ minorVersion, licenseeType, yearsOfUpgrade, freeMonths);
/* */ }
private static int decodeFreeMonthsFromHeader(String header)
/* */ {
/* 144 */ char encodedFreeMonths = header.toLowerCase().charAt(9);
/* */
/* 146 */ int freeMonths = encodedFreeMonths > '`' ? encodedFreeMonths - 'W' :
/* 147 */ encodedFreeMonths - '0';
/* 148 */ return freeMonths;
/* */ }

实际用到了11位,通过各种校验猜出前这个字符串的可能值
“XAxx36A17Ixx” x代表不知道,因为压根没校验到 所以随便填17I是代表还有12个月的激活时间 实际可以填更长的,A是代表激活的是pro版本
整个doVerifyLicenseKey 读下来 我发现成功的时候执行了以下代码

1
2
//2 targetStatus 没注册的话是7
this.validity = LicenseVerifier.createValidity(targetStatus, licensedTo, header)

此时 targetStatus 为2
所以我就把一大段的代码都注释掉了,替换成这两句话

1
2
LicenseKeyHeader header = LicenseKeyHeader.decode("XAXM36A17Ixm");
this.validity = LicenseVerifier.createValidity(2, licensedTo, header);

结果可行了 没有任何校验 序列号邮箱随便填,就通过了之后就没深究原因了,估计是会存储一个破解状态在本地了,因为看加载日志 每次都会加载这些基本信息的

ps

暴力读代码不可取,前后花了10多个小时

相关资源

1
2
3
4
5
<dependency>
<groupId>org.eclipse.tycho</groupId>
<artifactId>org.eclipse.osgi</artifactId>
<version>3.10.101.v20150820-1432</version>
</dependency>